![[C# Helper]](../banner260x75.png)
|
|
 |
![[Beginning Database Design Solutions, Second Edition]](db2_79x100.png)
![[Beginning Software Engineering, Second Edition]](book_sw_eng2_79x100.png)
![[Essential Algorithms, Second Edition]](book_algs2e_79x100.png)
![[The Modern C# Challenge]](book_csharp_challenge_80x100.jpg)
![[WPF 3d, Three-Dimensional Graphics with WPF and C#]](book_wpf3d_80x100.png)
![[The C# Helper Top 100]](book_top100_80x100.png)
![[Interview Puzzles Dissected]](book_interview_puzzles_80x100.png)
![[C# 24-Hour Trainer]](book_csharp24hr_2e_79x100.jpg)
![[C# 5.0 Programmer's Reference]](book_csharp_prog_ref_80x100.png)
![[MCSD Certification Toolkit (Exam 70-483): Programming in C#]](book_c_cert_80x100.jpg)

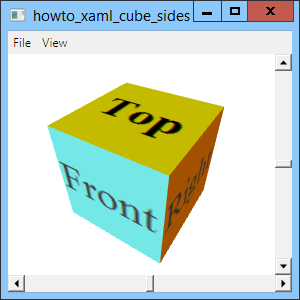
Title: Make a 3D cube with pictures on its sides with XAML and C#
This example extands the previous one Rotate a 3D cube using XAML and C# to draw a 3D cube with pictures on its sides. As I mention in the previous post, the GeometryModel3D object that defines the cube can display only a single material. There are two basic approaches for displaying a different image on each side of the cube. First, you can make one big image that contains the six images you want to use for the sides. Then when you define each side's triangles, you set their texture coordinates so they each display the appropriate part of the big image. The second approach is to make a separate GeometryModel3D object for each side. The first approach is particularly common for game and other high-performance 3D applications because it is more efficient for the graphics hardware to display many triangles that use the same texture than to display many separate objects that use different textures. However, this program was supposed to make it easy to display cubes with different pictures so, to make changing the pictures as easy as possible, I decided to use a separate texture and GeometryModel3D for each side. The following code shows how the program defines the cube's top face.
<!-- Top --> <GeometryModel3D> <GeometryModel3D.Geometry> <MeshGeometry3D Positions = "-1,1,1 1,1,1 1,1,-1 -1,1,-1" TriangleIndices = "0 1 2 2,3,0" TextureCoordinates="0,1 1,1 1,0 0,0" /> </GeometryModel3D.Geometry> <GeometryModel3D.Material> <DiffuseMaterial> <DiffuseMaterial.Brush> <ImageBrush ImageSource="Top.png"/> </DiffuseMaterial.Brush> </DiffuseMaterial> </GeometryModel3D.Material> </GeometryModel3D> The difference between this code and the code in the previous example is that this object's material uses an image file to define its brush. The cube's other faces are similar. (This example has two other useful features: the ability to respond to menu commands and the ability to save the cube's image into a file. I'll explain them in later posts.) Download the example to experiment with it and to see additional details. |