![[C# Helper]](../banner260x75.png)
|
|
 |
![[Beginning Database Design Solutions, Second Edition]](db2_79x100.png)
![[Beginning Software Engineering, Second Edition]](book_sw_eng2_79x100.png)
![[Essential Algorithms, Second Edition]](book_algs2e_79x100.png)
![[The Modern C# Challenge]](book_csharp_challenge_80x100.jpg)
![[WPF 3d, Three-Dimensional Graphics with WPF and C#]](book_wpf3d_80x100.png)
![[The C# Helper Top 100]](book_top100_80x100.png)
![[Interview Puzzles Dissected]](book_interview_puzzles_80x100.png)
![[C# 24-Hour Trainer]](book_csharp24hr_2e_79x100.jpg)
![[C# 5.0 Programmer's Reference]](book_csharp_prog_ref_80x100.png)
![[MCSD Certification Toolkit (Exam 70-483): Programming in C#]](book_c_cert_80x100.jpg)

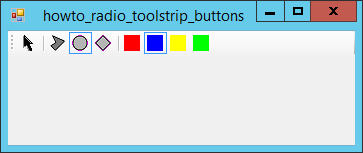
Title: Make toolstrip buttons act like radio buttons in C#
Sometimes it is useful to make toolstrip buttons behave like radio buttons so the user can pick only one of a set of buttons. This example lets you pick one of the shape tools or the select (arrow button) and one of the color buttons. The program uses arrays to keep track of the toolstrip buttons that should act as exclusive groups. The following code shows how the program declares and initializes the arrays.
// Arrays of exclusive tools. private ToolStripButton[] ShapeTools, ColorTools; // Initialize the exclusive tool arrays. private void Form1_Load(object sender, EventArgs e) { // Prepare the shape tools. ShapeTools = new ToolStripButton[] { toolArrow, toolPolygon, toolCircle, toolDiamond }; foreach (ToolStripButton btn in ShapeTools) { btn.Click += toolShape_Click; } // Prepare the color tools. ColorTools = new ToolStripButton[] { toolRed, toolBlue, toolYellow, toolLime }; foreach (ToolStripButton btn in ColorTools) { btn.Click += toolColor_Click; } } The code first declares the arrays for the groups of shape and color tools. The form's Load event handler initializes the ShapeTools array. It then loops through the array registering the toolShape_Click event handler for each of the buttons' Click events. The code then repeats those steps for the color tools. The following code shows the toolShape_Click and toolColor_Click event handlers.
// Allow only one shape selection at a time. private void toolShape_Click(object sender, EventArgs e) { SelectToolStripButton(sender as ToolStripButton, ShapeTools); } // Allow only one color selection at a time. private void toolColor_Click(object sender, EventArgs e) { SelectToolStripButton(sender as ToolStripButton, ColorTools); } These event handlers simply call the SelectToolStripButton method, passing it the toolstrip button that was clicked and the array of buttons in its group. The following code shows the SelectToolStripButton method, which does all of the interesting work.
// Select the indicated button and deselect the others. private void SelectToolStripButton(ToolStripButton selected_button, ToolStripButton[] buttons) { foreach (ToolStripButton test_button in buttons) { test_button.Checked = (test_button == selected_button); } } This method loops through the toolstrip buttons in an exclusive group. For each button, it sets the button's Checked property to true if that is the button that should be selected. It sets the button's Checked property to false if it should not be selected. That's all there is to it. Note that the program sets the toolstrip buttons' Checked event handlers at run time in the form's Load event handler. That lets you use the Form Designer to assign a different Click event handler to each button much as you normally would, and the buttons will raise both of the event handlers when clicked. In this example, all of the buttons use the following Click event handler assigned at design time.
private void tool_Click(object sender, EventArgs e) { ToolStripButton btn = sender as ToolStripButton; Console.WriteLine(btn.Text); } This event handler simply displays the button's text in the console window. Presumably in a real application the buttons would do something more useful. Download the example to experiment with it and to see additional details. |